原始内容
Pi Voice STT
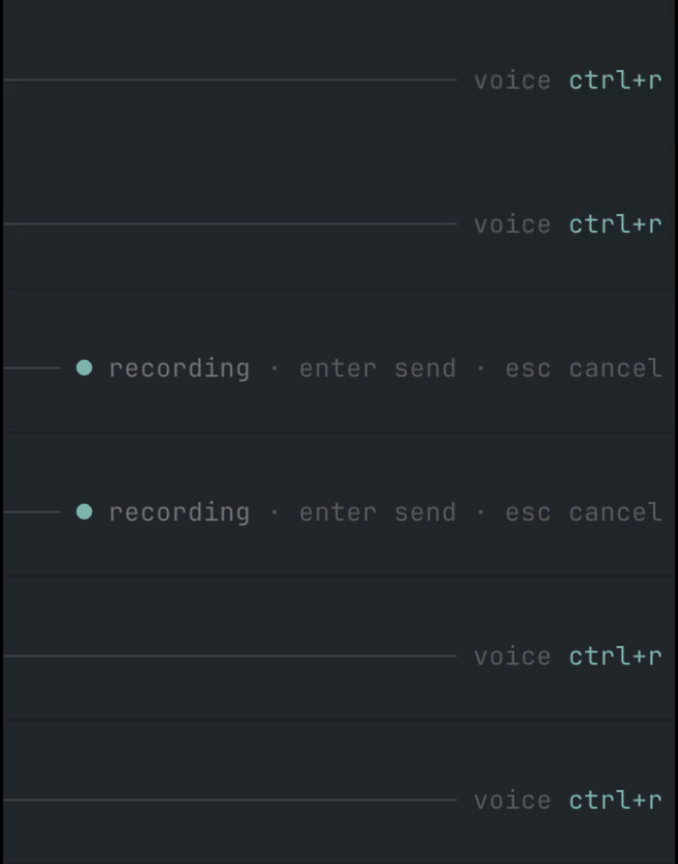
Provider-agnostic speech-to-text dictation for the Pi coding agent TUI.
Press Ctrl+R to record your microphone, press it again to transcribe and insert the transcript into the active prompt, press Enter while recording to transcribe and send it directly to chat, or press Esc to cancel recording/transcription.
This project is intentionally small and hackable: a Pi extension, local/bridge audio recorders, and OpenAI-compatible/Mistral transcription providers.
Features
- Pi TUI extension with
/sttcommand andCtrl+Rshortcut. Enter-to-send andEsc-to-cancel while recording.- Pi-native animated input indicator, right-aligned in the prompt border (
voice ctrl+r,● recording,• transcribing). ffmpegmicrophone capture to temporary WAV files.- Optional Mac microphone bridge for Pi sessions running on a VPS over SSH.
- Mistral Voxtral provider.
- OpenAI / Groq / generic OpenAI-compatible provider for hosted and local Whisper-style endpoints.
- Native provider integrations for Deepgram, ElevenLabs Scribe, Gladia, and AssemblyAI.
- Environment variable and macOS Keychain secret lookup.
- HTTPS-by-default endpoint policy; plain HTTP is allowed only for loopback hosts.
- TypeScript source loaded directly by Pi; no build step required for runtime.
Requirements
- Pi
>= 0.75. - Node.js
>= 20when developing locally. ffmpegavailable inPATHor configured withcapture.ffmpegPath.- Microphone permission for the terminal app running Pi, or for the Mac bridge daemon when using
capture.type: "bridge". - A transcription backend (Mistral, OpenAI/Groq, Deepgram, ElevenLabs, Gladia, AssemblyAI, or a local OpenAI-compatible server).
Installation
From GitHub
pi install npm:pi-voice-stt
Restart Pi or run /reload.
GitHub install also works:
pi install git:github.com/cgarrot/pi-voice-stt
Local development install
git clone https://github.com/cgarrot/pi-voice-stt.git
cd pi-voice-stt
npm install
npm run ci
pi -e .
You can also add the local path to Pi settings:
pi install /absolute/path/to/pi-voice-stt
Configuration
Pi Voice STT reads configuration from the first available source:
PI_STT_CONFIG=/path/to/config.json~/.pi/agent/stt.json- built-in defaults
The shortcut defaults to Ctrl+R. Override it with either:
PI_STT_KEYBIND=ctrl+shift+r pi
or a top-level keybind in the config file. Environment wins at startup.
Note: the keybinding is registered when the extension loads. After changing
PI_STT_KEYBINDorkeybind, restart Pi or run/reloadfrom a Pi process launched with the new environment.
Output options
{
  "output": {
    "appendTrailingSpace": true,
    "submitOnStop": false
  }
}
appendTrailingSpace(defaulttrue): append a space after the inserted transcript.submitOnStop(defaultfalse): whentrue, stopping a recording with theCtrl+Rtoggle also sends the transcript to chat (same as pressingEnterwhile recording) instead of only inserting it into the prompt. Hands-free dictation:Ctrl+Rto start,Ctrl+Rto stop-and-send,Escto cancel.replacements(default{}): a literal dictionary applied to the raw transcript before cleanup. Case-insensitive and word-boundary aware; longer keys win. Handy for terms the recognizer mishears:
{
  "output": {
    "replacements": { "super base": "Supabase", "react native": "React Native" }
  }
}
Localization
Runtime labels and toasts default to English. Switch them with the top-level locale setting (or the PI_STT_LOCALE environment variable). Built-in packs: en (default) and fr.
{
  "locale": "fr"
}
Like the keybinding, the locale is resolved when the extension loads — restart Pi or run /reload after changing it. A ready-to-copy French config is provided in examples/stt.fr.json. The product name is never localized.
Modes
Modes are named presets that override any part of the configuration. Built-in modes: default (no overrides) and raw (skips AI cleanup). Define your own under modes and switch at runtime with /stt mode <name> (or set a default via the top-level mode setting / PI_STT_MODE).
{
  "mode": "default",
  "cleanup": { "enabled": true, "endpoint": "https://api.openai.com/v1/chat/completions", "model": "gpt-4o-mini", "apiKeyEnv": "OPENAI_API_KEY" },
  "modes": {
    "raw": { "cleanup": { "enabled": false } },
    "commit": { "cleanup": { "language": "en", "prompt": "Rewrite the dictation as a concise, imperative git commit subject line." } }
  }
}
A user mode overrides the built-in of the same name. /stt mode with no argument prints the active mode and the available list. The mode applies on top of the base config, so it can change the provider, cleanup, language or replacements.
Voice commands
Optionally trigger an action by ending your dictation with a keyword. Disabled by default; keywords are configurable (English by default, override for any language).
{
  "commands": {
    "enabled": true,
    "send": ["send", "send it"],
    "clear": ["scratch that", "delete that"],
    "newline": ["new line"]
  }
}
send: strip the keyword and send the prompt to chat (even whensubmitOnStopis off).clear: discard the current dictation without inserting anything.newline: insert the text followed by a line break.
The keyword is only detected at the very end of the transcript, ignoring trailing punctuation. Voice commands are parsed before the AI cleanup pass.
Smart cleanup (AI)
Optionally run the raw transcript through an LLM before it is inserted, to fix punctuation, capitalization, remove filler words and spell project-specific terms correctly. Disabled by default. Because Pi exposes no one-shot inference API, cleanup calls its own OpenAI-compatible chat endpoint (works with OpenAI, Groq, Mistral or a local server), reusing the same secret resolution as the STT providers.
{
  "cleanup": {
    "enabled": true,
    "endpoint": "https://api.openai.com/v1/chat/completions",
    "model": "gpt-4o-mini",
    "apiKeyEnv": "OPENAI_API_KEY",
    "language": "auto",
    "useRepoContext": true,
    "projectTerms": ["Supabase", "HyperFrames"]
  }
}
enabled(defaultfalse): turn the cleanup pass on.endpoint/model/apiKeyEnv/keychainService/keychainAccount: same secret handling as STT providers; HTTPS required unless the endpoint is localhost.language(default"auto"):"auto"keeps the spoken language; set e.g."fr"to normalize the output.prompt: override the base system prompt.projectTerms: glossary of terms the model should spell correctly (e.g."super base"→Supabase).useRepoContext(defaultfalse): include the current git branch as context.maxTokens(default2000),timeoutSeconds(default30).
If the cleanup call fails or times out, the raw transcript is used instead — dictation is never blocked. The indicator shows a distinct polishing state during the pass.
Language detection
Set provider.language to a specific code (e.g. "en", "fr") to force a language, or to "auto" (or leave it empty) to let the provider detect the spoken language automatically — useful for code-switching (e.g. French with English technical terms). "auto" is treated as "no language hint" and is supported by every provider.
Mistral Voxtral
{
  "keybind": "ctrl+r",
  "capture": {
    "type": "ffmpeg",
    "inputFormat": "avfoundation",
    "input": ":0",
    "sampleRate": 16000,
    "channels": 1,
    "maxSeconds": 120,
    "minBytes": 4096
  },
  "provider": {
    "type": "mistral",
    "model": "voxtral-mini-2602",
    "apiKeyEnv": "MISTRAL_API_KEY",
    "language": "fr"
  },
  "output": {
    "appendTrailingSpace": true
  }
}
OpenAI
{
  "provider": {
    "type": "openai",
    "model": "gpt-4o-mini-transcribe",
    "apiKeyEnv": "OPENAI_API_KEY",
    "language": "en"
  }
}
You can also use model: "whisper-1" or any OpenAI transcription model supported by your account.
Groq / Whisper
{
  "provider": {
    "type": "groq",
    "model": "whisper-large-v3-turbo",
    "apiKeyEnv": "GROQ_API_KEY",
    "language": "en"
  }
}
Generic OpenAI-compatible endpoint
{
  "provider": {
    "type": "openai-compatible",
    "endpoint": "https://api.openai.com/v1/audio/transcriptions",
    "model": "whisper-1",
    "apiKeyEnv": "OPENAI_API_KEY",
    "language": "en"
  }
}
Deepgram
{
  "provider": {
    "type": "deepgram",
    "model": "nova-3",
    "apiKeyEnv": "DEEPGRAM_API_KEY",
    "language": "en",
    "smartFormat": true
  }
}
ElevenLabs Scribe
{
  "provider": {
    "type": "elevenlabs",
    "model": "scribe_v1",
    "apiKeyEnv": "ELEVENLABS_API_KEY",
    "language": "en"
  }
}
Gladia
{
  "provider": {
    "type": "gladia",
    "apiKeyEnv": "GLADIA_API_KEY",
    "language": "en",
    "pollIntervalMs": 1000
  }
}
"gradium" is accepted as a compatibility alias for "gladia" in case you remember the provider by that name.
AssemblyAI
{
  "provider": {
    "type": "assemblyai",
    "model": "universal",
    "apiKeyEnv": "ASSEMBLYAI_API_KEY",
    "language": "en",
    "pollIntervalMs": 1000
  }
}
Local STT server
{
  "provider": {
    "type": "openai-compatible",
    "endpoint": "http://localhost:10301/v1/audio/transcriptions",
    "model": "whisper-1",
    "apiKeyEnv": "",
    "language": "en"
  }
}
Plain HTTP is accepted only for localhost, 127.0.0.1, or ::1.
Mac microphone bridge for VPS usage
Use this when Pi runs on a VPS but your real microphone is on your Mac. The extension keeps the same Ctrl+R UX, but audio capture is delegated to a small local Mac daemon through a reverse SSH tunnel. The bridge is opt-in: it only activates when you set capture.type: "bridge" — the default ffmpeg recorder is unchanged.
See docs/macos-bridge.md for the full setup guide (architecture, prerequisites, security model, troubleshooting, uninstall).
1. On your Mac, run the installer with the SSH alias of your VPS (as configured in ~/.ssh/config):
tools/install-macos-bridge.sh my-vps
This installs the daemon, a reverse-SSH-tunnel LaunchAgent, generates a shared bearer token, and adds a <vps>-voice-tunnel SSH host with RemoteForward. See the installer header (tools/install-macos-bridge.sh) for env overrides (port, node/ffmpeg/cmux paths).
2. Copy the token to your VPS so Pi on the VPS can authenticate to the tunnel:
scp ~/.config/pi-voice-stt-bridge/token my-vps:~/.pi/agent/pi-voice-stt-bridge.token
3. On your VPS, point Pi at the bridge (e.g. ~/.pi/agent/stt.json):
{
  "capture": {
    "type": "bridge",
    "endpoint": "http://127.0.0.1:18765",
    "tokenFile": "~/.pi/agent/pi-voice-stt-bridge.token",
    "requestTimeoutSeconds": 30,
    "maxSeconds": 120,
    "minBytes": 4096
  },
  "provider": {
    "type": "groq",
    "model": "whisper-large-v3-turbo",
    "apiKeyEnv": "GROQ_API_KEY",
    "language": "fr"
  }
}
Run /stt doctor in Pi to verify the bridge health. The daemon only accesses the microphone when Pi calls /start after Ctrl+R; /stop returns the WAV to the VPS for transcription by your configured provider. On macOS the installer prefers a tiny native background app (Pi Voice STT Bridge.app) so microphone permission works without keeping a terminal open — the first /start may trigger a permission prompt.
Audio capture notes
With capture.type: "ffmpeg", the extension records through ffmpeg. Platform defaults are:
| OS | inputFormat |
input |
|---|---|---|
| macOS | avfoundation |
:0 |
| Linux | pulse |
default |
| Windows | dshow |
audio=Microphone |
On macOS, list devices with:
ffmpeg -f avfoundation -list_devices true -i ""
Then set capture.input, for example ":0" or ":1".
On Linux, you may prefer PulseAudio/PipeWire (pulse) or ALSA (alsa) depending on your system.
"Recording is too small" / no audio captured
This means the configured audio source produced no data. To fix it:
- Microphone permission — grant microphone access to the terminal running Pi (System Settings → Privacy & Security → Microphone).
- Pick the right source (Linux/PulseAudio). List sources and target one that actually captures:
Then set, for example,pactl list short sources"inputFormat": "pulse", "input": "alsa_input.pci-0000_00_1b.0.analog-stereo". - Fallback to ALSA if the PulseAudio default is empty or suspended:
List ALSA devices with{ "capture": { "inputFormat": "alsa", "input": "default" } }arecord -L(common inputs:default,hw:0,plughw:0). - macOS — confirm the device with
ffmpeg -f avfoundation -list_devices true -i ""and setcapture.input(e.g.":1").
You can also lower the threshold with capture.minBytes (default 4096), but a working source should far exceed it. See docs/macos-bridge.md for the VPS bridge as an alternative when the VPS has no local microphone.
Usage
The voice state is displayed inside the input area, right-aligned on the prompt border, so it stays close to where you are typing without taking over the footer/token line. Recording uses a subtle blinking dot; transcription uses a small horizontal moving dot.
| Action | Behavior |
|---|---|
Ctrl+R while idle |
Start recording |
Ctrl+R while recording |
Stop, transcribe, insert transcript into the prompt (or send it directly when output.submitOnStop is true) |
Enter while recording |
Stop, transcribe, insert transcript, send prompt to chat |
Esc while recording/processing |
Cancel recording or transcription |
/stt status |
Show current mode and config source |
/stt doctor |
Check config, provider readiness, and local ffmpeg or bridge health |
/stt start |
Start recording |
/stt stop |
Stop and insert transcript |
/stt send |
Stop and send to chat |
/stt cancel |
Cancel active recording/transcription |
/stt mode [name] |
Show or switch the active preset (default, raw, or your own) |
Secret handling
Prefer environment variables:
export MISTRAL_API_KEY=...
export OPENAI_API_KEY=...
export GROQ_API_KEY=...
export DEEPGRAM_API_KEY=...
export ELEVENLABS_API_KEY=...
export GLADIA_API_KEY=...
export ASSEMBLYAI_API_KEY=...
You can also point at a file containing either the raw key or an env-style line such as export MISTRAL_API_KEY=...:
{
  "provider": {
    "type": "mistral",
    "apiKeyFile": "~/.config/opencode/voxtral-stt.env"
  }
}
On macOS, you can also use Keychain:
{
  "provider": {
    "type": "mistral",
    "keychainService": "pi-voice-stt",
    "keychainAccount": "your-account"
  }
}
The extension calls:
security find-generic-password -w -s <service> -a <account>
Development
npm install
npm run check
npm test
npm run smoke
npm run ci
Project layout:
src/index.ts                 Pi extension entry point
src/core/                    dictation state machine
src/audio/                   ffmpeg and bridge recorders
src/providers/               STT provider abstraction
src/config/                  config loading and validation
src/ui/                      Pi TUI input indicator and editor wrapper
examples/                    ready-to-copy config files
tools/                       optional Mac bridge daemon/installer
Design goals
- Keep provider code independent from Pi so new backends are easy to add.
- Keep the Pi integration thin and readable.
- Match Pi's TUI style by default: compact input-border status instead of a separate footer widget.
- Avoid storing secrets in sessions or config examples.
- Use only Node built-ins at runtime.
- Fail safely: clean up temporary files and stop local or bridged
ffmpegon cancel, reload, or exit.
License
MIT